Knife Sharpening Tips: How to Keep Your Blades Razor Sharp
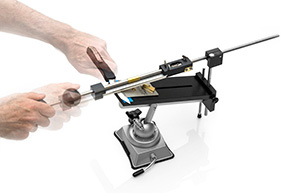
Knowing how to sharpen a knife properly is key to getting the longest life and best performance from your blades. Both the Apex and BevelTech sharpening systems produce the same high-quality edge on any knife. The difference is in adjustability, control, and precision features.
The BevelTech is built for users who are more serious about sharpening. It adds laser-engraved angle markings for fast, repeatable setups, an upgraded pivot system for smoother and more consistent movement, strong front-mounted table magnets to help support the blade during sharpening, and a stone arm designed to accept a digital angle gauge for precise angle verification. The BevelTech is also height adjustable, allowing you to stand comfortably while sharpening for longer sessions. For commercial sharpeners and high-volume users, the BevelTech is the recommended system.
The Apex sharpening system is smaller, lighter, and more portable. It is an excellent choice for home kitchens, hunting and fishing gear, and anyone who wants professional results in a compact, easy-to-store sharpener.
Both systems are backed by a lifetime guarantee.
Essential Tips for Knife Sharpening
A sharp knife isn’t luck — it’s the result of a repeatable knife sharpening process. The tips below focus on maintaining a consistent edge angle, sharpening the full length of the blade, and building habits that directly improve edge retention. When you sharpen regularly, dialing in these fundamentals helps you produce cleaner bevels, reduce wasted strokes, and get more life out of your sharpening stones — saving both time and materials in the long run.
- Important Note to Customers Learn time saving tips like not reprofiling your knife
- Serrated Knives Sharpen a serrated knife without knocking the points off
- Chisel Grind Even a curved chisel is no problem with the Edge Pro kits
- Re-Curve Blades Select a half inch stone for re-curve blades
- Tanto Blades Learn techniques for multiple bevels on tanto blades
- Riser Blocks Sharpen a short blade without moving the knife for perfect tracking
- Ceramic Hones For finishing the edge and bringing the edge back between sharpening
- Crossover Chart A conversion chart for Chosera and Shapton Stones to Edge Pro.
1. Important Note to Customers
When you re-profile to a very low angle you wind up with a very wide bevel that is very difficult to get sharp, and it leaves you with a very weak edge. Instead, keep your primary bevel up at 19 degrees or higher and put on a second bevel between 10 and 15 degrees. You can make your primary bevel very small, like 25 or 30 thousandths wide. Now the knife will re-sharpen in seconds with only a very fine stone or even a tape. This will make the knife cut with such little effort it will amaze you. Also note, this is not a micro bevel. A micro bevel is achieved with the ceramic hone.
Second Note to customers: If you are sharpening a flexible blade, move the knife across the machine as you sharpen. If you are sharpening a stiff blade, put the knife across the machine and sharpen the whole blade without moving the knife. This will give you perfect tracking and a slight angle gain at the tip, which helps minimize the wide bevel that develops at the end of the knife. The wide bevel develops because as you get closer to the tip, the edge of the knife moves into a thicker part of the blade. Learn more specific knife sharpening techniques below.
2. Serrated Knives
- Put felt marker on the flat side of the edge.
- Set the PIVOT as low as it will go.
- Use a 400 stone, and slide the stone across the knife.
- Set the PIVOT so the stone is making a cut, (the full width of the serration.)
- [If you are using an Apex, you may need a lower angle than you can set. For this, slide a piece of cardboard under the KNIFE GUIDE. Let is stick out 1/8". Set the back of the knife on the cardboard. This will tilt the blade and give you the lower angle you need.]
- Make a light pass down the blade and make sure the stone is cutting the full width of the serration.
- If needed, reset the pivot. Turn the knife so the points are pointing up into a good light. You will see shiny spots on the pips of the serrations.
- Continue sharpening until the shiny spots begin to disappear.
- Stop sharpening before you get any burr on the tips.
- Finish by running a ceramic hone through each serration to remove any burr in the serrations.
Related video:
Sharpening a serrated knife
3. Chisel Grind
- Set the PIVOT to the factory angle on the bevel side of the knife.
- Sharpen to the stone or polish tape you are going to finish with.
- If you do not want to make any marks on the FLAT side of the blade, put a piece of painters tape on the FLAT side at the TOP of the blade.
- To remove the burr, use the stone or tape you used to finish the bevel side.
- (This last step, you will do free hand) Lay the stone flat on the flat side of the blade. The stone will ride on the tape and the edge, and will not scratch the knife.
- Slide the stone back and forth at 90 degrees to the edge. This will remove the burr.
- Check to see the burr does not re-appear on the bevel side. If it does, make a light pass on the beveled side, and run the stone down the flat side with your finishing stone.
- As the edge gets dull you can bring it back with the ceramic hone. Just remember to run very close to flat on the flat side.
4. Re-Curve Blades
- These knives have a concave shape to the blade
- If the concave is shallow you can sharpen it with the standard 1" wide stones.
- If the concave is deep or has a sharp curve, then you will need the 1/2" wide stones.
- You can cut the bevel in with the 1" stones, but you will need the 1/2" stones to get a good finish.
- For practical reasons, purchase the stone you will be finishing with in 1/2".
- 1/2" polish tape blanks are also available for a polished edge.
- If you are just going to use your 1" stone, it really helps to round the edges of the stones with a diamond, sand or silicone carbide.
Related video:
Sharpening recurves and tantos
5. Tanto Blades
- Place the knife straight across the BLADE TABLE.
- Set the PIVOT, and start to sharpen the main part of the edge.
- Use a felt marker to check the angle on the front bevel. Sometimes it is much steeper than the main bevel.
- Ideally, you should be able to do the whole blade at the same angle. If so, you can sharpen the front bevel without moving the knife. If not, you will have to reset for the front bevel. If the blade is too short to do this, then you can angle the knife across the corner of the KNIFE GUIDE with the front bevel just over the front edge of the BLADE TABLE.
- The alternative is to use the small knife attachment so you can sharpen both edges without moving the blade.
Related video:
Sharpening recurves and tantos
6. Riser Blocks
- The RISER BLOCK allows you to sharpen a short blade without moving the knife for perfect tracking.
- Put on the GUIDE CLIP.
- You will need a scrap of wood that is thicker than one side of the handle on the knife. You need to elevate the blade enough so the handle will clear the BLADE TABLE.
- Cut out a piece of wood that is the length and width of the knife blade.
- Lay the blade on the RISER BLOCK and mark the shape of the curve at the front of the blade and cut to that shape.
- If the knife has thumb studs, notch the back corners.
- Use painters tape to tape the RISER BLOCK to the front of the BLADE TABLE.
- Bring the KNIFE GUIDE up against the RISER BLOCK and lock it in place.
- If the GUIDE CLIP does not come up high enough to catch the back of the blade, put a piece of cardboard under it.
- You can now rest the knife blade on the RISER BLOCK.
- Sharpen the whole blade without moving the knife.
7. Ceramic Hones
Ceramics are recommended to bring the edge back between sharpening. The Edge Pro edge is much stronger than a free hand sharpening edge. Therefore, using the ceramic hone will re-sharpen in seconds, up to 15 times, because it removes so little metal. The ceramic puts a micro-bevel on the edge of the knife, creating a very strong and sharp edge. Many customers wonder why we don't mount the ceramic hone in the machine. The reason is it must be used at a slightly increased angle, and with little pressure. This is very easy, and fast to do free hand. We do not recommend regular sharpening steels, as even the finest one will damage the edge.
Related video:
Polishing your blade
8. Crossover Chart
Crossover chart for Chosera and Shapton Stones to Edge Pro.
